The journey has begun!
We recently "soft" launched our digital download of ZOMBORGS Episode 1. A sci-fi horror series about a girl, an android, a corporate cult, and lots of zombies with a bit of extra "holy-eff!"
We're determined to see how far UE5, Blender, and Synthography can take us to make a high-end trailer for the script book currently available for download (here). The goal isn't to "just get it done." We want to create Hollywood-quality visuals for a series that could be an epic tale of human identity and social conformity.
Sure, we've worked in video production for all of our adult lives, but in order to do the high-end visuals we want we'd need a massive budget, epic gear, and a vfx powerhouse propelling us forward to a big fat Hollywood "maybe." None of which we have at the moment.
What we do have, however, is self-taught 3D design skills, a general understanding of animation in UE5 & blender, comfort in stable diffusion, and an iPhone.
That should get us where we gotta go, right?
Maybe.
The Test
The test we ran this week explored what the workflow would look like if we face-captured with UE5's new Metahuman Animator, ported that into a metahuman, and then took those frames into stable diffusion to get our custom character talking using a voice2voice trained model.
The Models
Thankfully, we already had our LORA's trained from our script-book project. And we already knew that we liked the LifeLikeDiffusion model found on CivitAI. It does a great job of capturing our ethnically diverse cast and life-like proportions & expressions.
We also already had our MetaHuman base designed, as we used these metahumans to influence our synthetic actors' looks with Midjourney img2img and blend workflows.
The Face MoCap
With the release of MetaHuman Animator earlier this month we splurged on a refurbished iPhone 12-mini and quickly got to work on testing the setup process. It took a minute, but Jwall is a genius and power hit the fine performance demonstrated in the test footage. Needless to say, we were impressed with the mocap capabilities and very pleased with the first test.
The Voice2Voice
Next up, we wanted to be able to use AI voices - but we didn't like any of the text-to-voice options. They sounded sterile, disturbing, and inhumane. Meaning we had to get acquainted with the voice2voice AI options out there. Unfortunately, I was unable to get the local option I wanted to try installed properly. So, for the sake of time, we went with the social media popular, Voice.ai (referral link).
A few years back I (Amber) had tried my hand at narrating audiobooks. It was one of the most grueling, fun, and underpaid gigs I'd done in my entire career. I narrated two books and ended my VO career quickly after. The bright side of having done it was I now have hours of audio that I could use to train my voice with. And so I did. Within an hour I had an ai voice model of myself. I ran Jwall's voice performance through it and BAM! We got us a girly voice!
It was really important to us that the voice be able to capture performance in tonality and expression. Voice.ai did a pretty good job. I just wish it wasn't so distorted. I ended up having to do A LOT of post-cleanup and it still sounds a bit off. But... we had a voice that was closer to that of a 13-year-old girl - so we moved on.
Stable Diffusion
The final step was putting our synthetic actress' face onto the performance. Using Runpod.io (referral link) we ran a RTX 3090 and hoped for the best. Using our previously trained Lora, img2img, controlNet, and the Roop extensions we hobbled our way through it.
The biggest issue I ran into was anything with a denoise over .15-.2 failed to capture the mouth movement. After generating 600 frames of failed small batch testing I was definitely grateful for the batch image option within Stable Diffusion.
Prompt Muse's "Taking AI Animation to the NEXT Level" tutorial was helpful in suggesting the scribbleHed option.
However, I wasn't really digging the fact that I couldn't get the LORA to manipulate the output more. Maybe I was doing something wrong...
But I eventually stumbled across Nerdy Rodent's "Easy Deepfakes in AUtomatic1111 with Roop" and everything began sorting itself out.
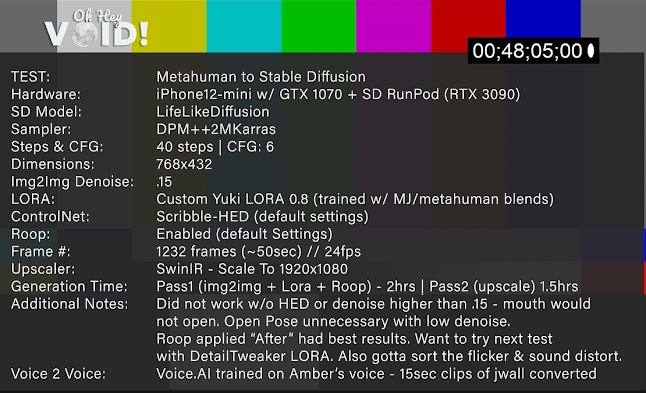
Here are the SD settings I ended up using as I recall them.
Sure, I probably could have got away with using the Roop extension only, but I wanted to run the lora as high as I could get it then apply roop to make sure the face looked as consistent and accurate as possible. Because, remember... I needed the girl to talk.
In the end... the results were a satisfying start.
For our next adventure we're planning to do more than just a single shot, maybe even throw in some body movement too. So this test definitely proved that it's possible to get the images to chatter and look semi-lifelike. We still have some work to do on the voice2voice ai, the flickering, and the additional facial movements. But we have faith that it's possible.
If you have any ideas on how to improve our workflow, DO SHARE! Either comment to this blog or the video above. Whichever you're more comfortable with.


